
In this series of tutorials, I will walk you through the process of creating a TODO app with the Flutter framework. By the end, you will have a cross-platform TODO mobile application, which allows you to add, edit, remove and complete tasks, while persisting the data on Google Firebase. The series spans across 3 parts:
Part 1 – Setting up the development environment and creating the project
Part 2 – Implementing core functionality
Part 3 – Connecting your app to Google Firebase
What is Flutter?
Flutter is a mobile development framework that allows you to create a cross-platform app, meaning the same code will run on both Android and IOS. It is written in Dart, and if you do not know it, you might want to read this tutorial first. If you want to find out more about Flutter and how it compares to React Native, head to this article.
In this series, I will focus on developing and running your app on Android, though it will also work perfectly fine on IOS. The reason for sticking with Android is that you need a Mac to run the IOS emulator, but the Android emulator will run on any platform. Google also developed a number of Flutter and Dart plugins for Android Studio, which will greatly simplify the process. Let me know in the comments if you want me to cover the IOS emulator and XCode as well.
Installing Android Studio
Head off to the Android Studio homepage and download the installer for your system. The installation process is straightforward and will offer you to download the Android SDK packages. To spare you some headache, let Android Studio handle the SDK setup process as it does a great job on its own. After you have installed Android Studio, you should see the following window:

Now let’s install the Dart and Flutter plugins for Android Studio. They add syntax highlighting and autocompletion for Dart, as well as ways to create a Flutter project. Go to Configure->Plugins and search for Flutter:

Press install under the Flutter plugin to add it to Android Studio. It is also going to offer you to install the Dart plugin, which you need to agree to. After you have installed the plugins and restarted the IDE, you should have the Start a new Flutter project button on the welcome screen:

Now, we need to take a step back. We have configured the IDE, but we still need to install the Flutter SDK.
Installing Flutter SDK
Go to the Flutter website to download the SDK for your OS. The installation process is similar across all systems: extract the archive to some well-known place (e.g. C://flutter for windows, ~/flutter for Mac and Linux). Then, add path to Flutter to the global PATH variable of your system. Here are the instructions for updating PATH on Windows, Mac, and Linux.
After setting up Flutter, you should be able to run flutter doctor in the command line to run Flutter internal tests that ensure your system is set up properly. In case it complains about Android licenses, you can run flutter doctor --android-licenses to fix it. Do not worry about the No devices available error, we are going to add some in the later step.
Create a Flutter project
Back in Android Studio, it is time to create our project. Click on Start a new Flutter project. In the next window, select Flutter application:

Next, Android Studio will ask you some details about your application. You need to come up with a project name, project location, and description. It also asks you for the Flutter SDK path, which we installed in the previous step.

Next, we are asked for the company domain. It is used for creating the package name, which will be important in case you decide to publish your app. You do not need to have an actual domain: this is just a way to differentiate your app from millions of others.

Now, we are done and Android Studio has all the information it needs to create the project. After a few seconds, the IDE will open with our project. This takes us to the next step: setting up an emulator.
Setting up an Android emulator
To run our application, we have to have an emulator running. Creating an emulator is straightforward in Android Studio. First, click on the little icon in the top right with a phone that opens the AVD (Android Virtual Device) Manager:

In the manager, click on the CREATE VIRTUAL DEVICE button. This will open a wizard that will walk you through creating your first emulator. First, you have to choose a phone to base your emulator on. I suggest sticking with the Pixel 3:

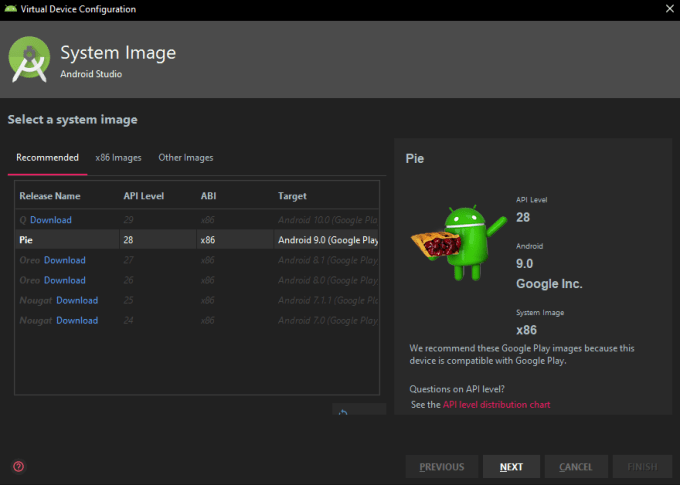
Next, you have to choose the Android image for the emulator to use. As Flutter does not work well with Android Q emulator, for now, choose Android Pie (you have to click the download link first):
Lastly, enter the name for your emulator and you should be ready to go.
As a side note, there is a way to boost the emulator performance (which is quite slow) by using virtualization. It is available if your processor supports virtualization (Intel VT or AMD V) and you are not running in a virtual machine. Detailed instructions are available here.
Another alternative is to use Genymotion. It offers a cloud-hosted Android emulator that resides on Genymotion’s servers and streams the picture to your PC. It is pretty fast and stable but also paid. I suggest looking into it if your organization is slowed down by the implications of the Android emulator.
Running the project
Finally, we are able to run our project. First, you have to have the emulator running. You can start it by opening the AVD Manager and clicking the play button next to your device. After a few moments, a device should appear:

With the emulator up and running, its time to launch our project. While we did not write any code yet, Android Studio wrote some for us so we can test if everything works correctly. In the top right corner, select your emulator from the list (to the right from MAIN.DART selector) and press the play button. After Android Studio builds the project, it will launch on the emulator. It should look like this:

🎉🎉🎉That is it! You have successfully installed Android Studio, Android Emulator and Flutter SDK, configured them and ran the default Flutter application. In the next part, we will explore the basic concepts of Flutter and implement the core functionality of our app. Please let me know of any problems you encountered and the next part is available here.
one comment