
React Native, together with Expo SDK, accelerated the process of mobile app development enormously. What if I told you you could push it even further by adopting continuous integration and deployment practices?
What is CI/CD?
CI/CD stands for continuous integration and continuous deployment. Continuous integration is the practice of integrating some changes in the code into the rest of the codebase and making sure it does not break anything (using unit tests and integration tests). Continuous deployment is the automation of the deployment process, allowing teams to save time and iterate faster. Combined together, these practices reduce the overhead of having a big team and codebase, make sure your code is clean and consistent, and allow the developers to focus on the code rather than the infrastructure.
What are Github Actions?
Github Actions are small scripts that can plug into common Github features, like opening a pull request, creating an issue, merging into master and so on. There are already thousands of actions created that you can use in your projects. Github Actions let you automate literally anything you can think of, including running tests, deploying builds to production, labeling PRs based on changed files and much more. Oh, and did I mention that Github Actions are completely free for public repositories 🎉 🎉 🎉?
Create a sample project
To show you the power of Github Actions, I will walk you through creating a simple Expo mobile app and setting up Github Actions to automate its testing and deployment. This tutorial is not about React Native though, so I will be assuming you have some knowledge on mobile development. If not, check out this tutorial first.
To create a new Expo SDK project, firstly make sure you have expo-cli installed by running this command:
npm i -g expo-cliNow you can create a project:
expo initExpo will ask you a few configuration questions. Choose blank as the app template and enter a name for your project. After a few minutes, your project will be created. You can check if everything works by opening the project folder and running this command:
expo startNote: you will need a mobile phone or an emulator with Expo client installed to run your app. This is how it should look:

Publish your project on Github
To use Github Actions, your project needs to be hosted on Github (duh). To do it, first create a repo on Github. This link will take you to the new repo page. Enter a name and a description (if you want to) for your new repo. After your repo is created, it is time to publish your project to Github. Open the terminal in the project folder and run these commands in it:
git remote add origin remote YOUR_REPO_URL_HERE
git push origin master
Now you can open your repo on Github and verify everything is there. I have also published my repo and made it public, you can refer to it any time you get lost.
Add a unit test framework
One of the most popular CI actions is running unit tests on every pull request. Of course, to run unit tests we need to have them in the first place. I will not go into detail about unit testing React Native projects here but feel free to check out this article for reference. To set up unit tests, we need some more packages:
npm i -S jest jest-expo react-native-testing-libraryjest is a test runner. It will collect our tests, run them, and report the results. jest-expo has some configuration specifically for Expo projects. react-native-testing-library has a collection of helpers to render and fire actions on components. After everything installs, create a file jest.config.js with this code in it:
This config tells jest to use the jest-expo preset and run tests twice, for Android and IOS. To run the tests, add this line to package.json in scripts section:
"test": "jest"You can try running tests right now with npm test , but it will fail as we do not have any right now.
Add features and unit tests
To add unit tests, we need to have something to test. Let’s add a counter and a button, which will increase the counter by one. Add this code to App.js:
This should look like this on the phone:

Now we need to test it. By default, jest will pick up tests in every file that ends with test.js . Create a file App.test.js and add this code in it:
This test suite will check for:
- Snapshot
- Counter initial value is 0
- Counter increases to 1 when button is pressed
You can run it with npm test . The output should look like this:

Add your first Github Action
Github Actions are written in YAML. YAML is a configuration language, very much like JSON, but more human-readable. These configs are stored in .github/workflows . Go ahead and create a file .github/workflows/tests.yml with this content:
This file defines a Github Action called Run test suite (line 1). I specified for it to run on any pull request (line 3). The jobs section defines what tasks are to be done. In our case, it is just one, build (lines 5-6). The strategy/matrix section is there to make sure our tests are consistent across environments. It is set up to test on every combination of OSes (win, lin, mac) and Node versions (8, 10, 12). This is a very robust solution but will take a lot of resources (every test case will run 3*3=9 times). You should consider removing some options if you are on a paid plan.
The steps section defines the specific steps to be taken. The -uses: actions/checkout@v1 line (14) uses another action that checks out the code from the branch to the environment. Then, the actions/setup-node@v1 (line 17) action installs Node to the same envrironment. Lastly, lines 21-23 list the actual terminal commands that will run. The npm ci is the same as npm install, but designed with CI/CD environments in mind. For one, it pulls the dependency info from package-lock.json , not from package.json. The last command runs the tests. If any of the tests fail, jest will return a non-zero code and Github will treat it as a fail.
Test your first action
After you commit and push your changes to Github, your action will be live. To test it, create a new branch:
git checkout -b testing-tests-actionWe have to change something in order to create a PR. Let’s change the text in App.js so our snapshots fail and we will update them later to make the tests pass. I simply changed clicked to pressed on line 12. Now, commit and push your branch to GitHub:
git add .
git commit -m 'dummy commit'
git push origin testing-tests-action
After that, go on Github and open a PR:

Once you open the PR, Github will run your actions immediately:

After a few minutes, the tests will fail. This is happening because we updated the UI, but not the snapshots. You can examine the output of the script by clicking Details:

Indeed, Jest is telling us that the snapshots are failing. To fix it, run npm test -- -u in the project folder. This will update the snap.android and snap.ios files. After they are updated, commit and push them again. Since you made changes to the PR, Github will run your action again. After a few minutes your tests should pass:

Simplify reviews with Github Actions
Unit tests are good, but most of the time you also want to test in on your phone. Of course, you can clone the PR on your PC and build it, but that sounds like too much work. Let’s automate it!
Back in master branch, create a file .github/workflows/review.yml with this code:
You can notice that this action also runs on every PR and uses now familiar checkout and setup-node actions. 3 new concepts here are the expo/expo-github-action, unsplash/comment-on-pr and secrets.
The expo-github-action has features to operate the expo-cli. It allows us to test, build and publish expo projects. To work, it requires a working Expo account. If you do not have one, go ahead and create one here. This action uses the PR id to publish the app to a specific release channel.
unsplash/comment-on-pr action is used to comment the link to Expo build on the PR. The URL is constructed on line 24. Be sure to change YOUR_APP_SLUG_HERE to your actual app slug (you can find it in app.json)
secrets is a safe way to pass credentials to actions without exposing them in the repo. If you examine the code, you can see that we need the EXPO_CLI_USERNAME, EXPO_CLI_PASSWORD, and GITHUB_TOKEN. The Expo secrets are simply the credentials for your Expo account which you created earlier. GITHUB_TOKEN is an access token for Github API and automatically injected by Github for you.
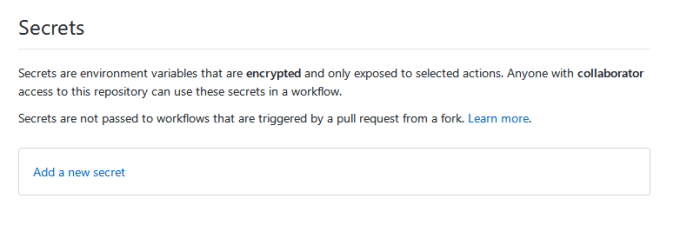
To add these credentials to secrets, open Settings section of your repo and select Secrets:
Now you can go ahead and add the Expo credentials:

Now your action should be ready to go. To check it out, create a new branch, change something (I made the background color green), and open a PR. We did it earlier, so I am not going to do a step-by-step again. After you do it, this action will build your app, publish it and comment a link on the PR:

Now anyone on your team can click this link on their phones and open this very PR on their phones! This works particularly well with the Github Mobile Client.
Automate your deployment with Github Actions
You could probably stop at this point, but I am very lazy, that is why we will also automate the deployments of our Expo app. It will run on every commit/merge to the master branch. Generally, your development will be concentrated on something like a develop branch, and you will make a release by merging it into master (or use an intermediate branch like release-candidate).
Thankfully, the deployment action is pretty straightforward and very similar to the previous one. Create a file .github/workflows/deploy.yml with this code:
As I said, everything should look familiar at this point. We checkout the code, install Node & Expo, run the tests, and publish. Running the tests seems redundant, but we will do it just to make sure broken builds never make it into production. You can now test this script by pushing anything to master branch (make sure the tests pass, though). Then your app should be available through the Expo client, and, if you made any production builds they should be updated as well.
Closing notes
Thank you for reading, I hope this guide will help you with your projects. Let me know in the comments what do you think and what other CI/CD actions you can think of!
Resources
- Companion repo
- 5 common pitfalls of CI/CD
- Continuous Integration, Delivery and Deployment: A Systematic Review on Approaches, Tools, Challenges and Practices
- Github Actions Marketplace
- Security Implications of Github Actions
- Expo SDK docs on CI/CD